Lecture 3: Installation and Usage of Toffee
Master the basic process and key technologies of using Toffee for chip verification, laying the foundation for independently completing verification tasks in the future.
Introduction
In the previous lecture, we learned how to use the Picker tool to convert RTL designs into modules that can be driven in high-level languages (like Python). Although Picker provides underlying hardware interaction capabilities, to build a structured, reusable, and easy-to-maintain verification environment, we need more comprehensive framework and methodology support.
Toffee was created exactly for this purpose. It is a hardware verification framework written in Python, built on top of Picker, aimed at providing a more efficient and standardized verification solution.
The main features of the Toffee framework include:
Standardized verification environment structure: Borrowing ideas from verification methodologies like UVM, it provides core components such as
Bundle(interface encapsulation),Agent(transaction-level driving and monitoring),Env(environment organization), andModel(reference model), guiding users to build layered, modular verification platforms.Integrated test case management (
toffee-test): Integrated with thepytestframework, thetoffee-testplugin simplifies the writing, execution, management, and report generation of test cases, supporting advanced test features likefixture.Built-in asynchronous support: Based on Python’s
asynciocoroutines at its core, it provides native support forasync/awaitand a series of asynchronous waiting mechanisms (such asAStep,ACondition), making it easy to handle concurrent behaviors and precise timing control.Functional coverage support: Built-in classes such as
CovGroup,CovPoint, andCovBinenable convenient definition, collection, and reporting of functional coverage, quantifying verification completeness.
Advantages of adopting the Toffee framework compared to using Picker directly:
Higher level of abstraction: Toffee elevates verification logic from underlying signal reads and writes to transaction-level operations, allowing test cases to focus more on “what to test” rather than “how to drive signals”.
Stronger structure and standardization: Provides clear verification environment components and organization methods, improving code readability, maintainability, and reusability.
Simplified testing process:
toffee-testautomates test case discovery, execution, and report generation, and integrates coverage collection, simplifying the management of the entire verification process.Methodology support: Incorporates best practices of verification methodologies (such as separation of driving and monitoring, transaction-level modeling, coverage-driven verification, etc.), helping beginners establish a standard verification mindset.
Easy to extend and collaborate: Modular design makes the verification environment easier to extend and more convenient for team members to collaborate.
In conclusion, Picker solves the problem of “how to interact with hardware using high-level languages”, while Toffee builds on this to provide a solution for “how to efficiently and standardly construct a complete verification environment using high-level languages”. This lecture will introduce the installation of Toffee and the usage of its core components in detail.
1. Installation of Toffee
After configuring your Python environment, you can install Toffee and its testing tool toffee-test via the following commands:
pip3 install pytoffee@git+https://github.com/XS-MLVP/toffee@master
pip3 install toffee-test@git+https://github.com/XS-MLVP/toffee-test@master
❗About
error: externally-managed-environmentDue to PEP 668, if this error occurs, it is recommended to use
venvto create a virtual environment, and then install and use toffee within the virtual environment.
After installation, we can try running an adder sample code to verify if the installation has completed successfully:
# Pull the code
git clone https://github.com/XS-MLVP/toffee.git --depth=1
# Enter the adder example folder
cd toffee/example/adder
# Build the dut
make dut
# Run the test
make run
If configured successfully, you will see:
test_adder.py::test_random PASSED
test_adder.py::test_boundary PASSED
2. Managing Test Cases Using toffee-test
In our previous environment, we had to manage test cases manually. toffee-test is a pytest plugin provided by toffee, used to manage toffee test cases.
💡About pytest: Pytest is a software testing framework in Python.
It makes it easy to write simple, readable test cases and has powerful extension capabilities, enough to support the complex functional testing needs of applications and libraries.
Pytest itself offers powerful features and a rich ecosystem. If you are interested, you can check out the pytest documentation and related plugin repositories to help you better complete your verification tasks.
In the random number generator example, the verification code using only picker is:
from RandomGenerator import *
import random

# Define reference model
class LFSR_16:
    def __init__(self, seed):
        self.state = seed & ((1 << 16) - 1)

    def Step(self):
        new_bit = (self.state >> 15) ^ (self.state >> 14) & 1
        self.state = ((self.state << 1) | new_bit ) & ((1 << 16) - 1)

if __name__ == "__main__":
    dut = DUTRandomGenerator()            # Create DUT
    dut.InitClock("clk")                  # Specify clock pin, initialize clock
    seed = random.randint(0, 2**16 - 1)   # Generate random seed
    dut.seed.value = seed                 # Set DUT seed
    # reset DUT
    dut.reset.value = 1                   # Set reset signal to 1
    dut.Step()                            # Advance one clock cycle
    dut.reset.value = 0                   # Set reset signal to 0
    dut.Step()                            # Advance one clock cycle

    ref = LFSR_16(seed)                   # Create reference model for comparison

    for i in range(65536):                # Loop 65536 times
        dut.Step()                        # DUT advances one clock cycle, generates random number
        ref.Step()                        # Ref advances one clock cycle, generates random number
        rand = dut.random_number.value
        assert rand == ref.state, "Mismatch"  # Compare random numbers generated by DUT and reference model
        print(f"Cycle {i}, DUT: {rand:x}, REF: {ref.state:x}") # Print results
    # Complete testing
    print("Test Passed")
    dut.Finish()    # The Finish function will complete writing of waveforms, coverage, and other files
After introducing toffee and toffee-test, we can automatically run test cases and collect results through pytest. For example, create test_with_toffee.py in the directory where RandomGenerator.v is located:
# test_with_toffee.py
from RandomGenerator import DUTRandomGenerator
import random
import toffee_test


# Define reference model
class LFSR_16:
    def __init__(self, seed):
        self.state = seed & ((1 << 16) - 1)

    def Step(self):
        new_bit = (self.state >> 15) ^ (self.state >> 14) & 1
        self.state = ((self.state << 1) | new_bit) & ((1 << 16) - 1)


@toffee_test.testcase
async def test_with_ref(dut: DUTRandomGenerator):
    seed = random.randint(0, 2**16 - 1)  # Generate random seed
    dut.seed.value = seed                # Set DUT seed
    #### Initialization part ####
    dut.reset.value = 1  # Set reset signal to 1
    dut.Step()           # Advance one clock cycle
    dut.reset.value = 0  # Set reset signal to 0
    dut.Step()           # Advance one clock cycle
    #### End of initialization ####
    ref = LFSR_16(seed)  # Create reference model for comparison

    for i in range(65536):  # Loop 65536 times
        dut.Step()          # DUT advances one clock cycle, generates random number
        ref.Step()          # Ref advances one clock cycle, generates random number
        # Compare random numbers generated by DUT and reference model
        rand = dut.random_number.value
        assert rand == ref.state, "Mismatch"


@toffee_test.fixture
async def dut(toffee_request: toffee_test.ToffeeRequest):
    # Create DUT using toffee and bind clock
    rand_dut = toffee_request.create_dut(DUTRandomGenerator, "clk")
    return rand_dut
Then run:
pytest . -sv # . represents the current directory in the command line
# To generate a report, execute
pytest . -sv --toffee-report
You can then see the test results output by pytest. A reports folder will also be created in the current directory, containing the visualized test report.
In the code using only picker, we have to place our test cases inside the top-level code environment to run them manually; while with the toffee introduced code, as long as it follows pytest specifications and adds the @toffee_test.testcase decorator, it can be managed and run by pytest. Moreover, pytest has rich features and plugins, for example, marks can be added to test cases to control which category of cases to run, etc.
2.1 Fixture
Before officially executing the test cases, pytest will first execute functions decorated with @toffee_test.fixture.
fixture is a common term in software testing. In pytest (as well as toffee-test), it refers to a mechanism for setting up test preconditions and managing test resources. Fixtures provide a clearly defined, reliable, and consistent test context for test cases.
Simply put, a fixture is like the “scaffolding” or “preparation area” of a test. It is responsible for preparing the required environment (such as creating DUT objects, starting the clock, initializing Agents, etc.) before running each test case that needs it, and performing possible cleanup operations (such as closing files, releasing resources) after the test ends.
Benefits of using Fixtures:
Code reuse: Extracting common setup logic (such as creating the DUT) into a Fixture prevents rewriting it in every single test case.
Separation of concerns: Test cases can focus on the testing logic itself, while leaving the environment preparation to the Fixture.
Resource management: Fixtures ensure that resources (like DUT instances) are correctly created when the test begins, and cleaned up (if needed) when the test concludes.
Dependency injection: The return value of a Fixture can be automatically “injected” as arguments to the test cases that require it.
In toffee-test, defining a Fixture needs to follow specific specifications:
@toffee_test.fixture # 1. Fixed decorator
async def dut(toffee_request: toffee_test.ToffeeRequest): # 2. Fixed parameter toffee_request
    # Setup logic of the Fixture
    ...
    rand_dut = toffee_request.create_dut(DUTRandomGenerator, "clk")
    ...
    # Return prepared resources
    return rand_dut # 3. Return value will be injected into the test case
Key Elements:
Decorator: Must use
@toffee_test.fixtureto declare that this is a Toffee test Fixture.Fixed parameter
toffee_request: The Fixture must include a parameter namedtoffee_request(its type istoffee_test.ToffeeRequest), which also provides some practical features (such as creating a DUTcreate_dut, or adding coverage groupsadd_cov_groups); the framework will pass this object in automatically.Return value: The Fixture function provides the prepared resources via
return.
Execution Mechanism and Dependency Injection:
When a test case (such as async def test_with_ref(dut: DUTRandomGenerator)) declares a parameter with the exact same name as a Fixture function (here it is dut), pytest/toffee-test will automatically perform the following operations:
Find Fixture: Discover the Fixture function named
dut.Execute Fixture: Before running the testcase, invoke this
dut()Fixture function first.Inject Results: Pass the return value of the
dut()Fixture function (which is theDUTRandomGeneratorinstance with the created and launched clock) to thedutparameter of the test casetest_with_ref.
⚠️Important Note: By default, each test case will receive an independent instance resulting from a re-execution of the Fixture. This means the
dutinstance used bytest_with_refand the one used by another test casetest_another(dut)are completely different objects, keeping their states isolated and ensuring the independence of the tests.
The figure below illustrates how the Fixture provides independent DUT instances for multiple test cases:
+---------------------------+
| fixture: dut()            |
| return: DUTRandomGenerator|
+---------------------------+
              |
              | Return Value
              v
        +--------------+
```        | DUT instance | Note: The result returned by the fixture is not shared between testcases; each testcase gets an independent instance.
        +--------------+
              |
              |
              |     +---------------------------------------------------+
              |     | @toffee_test.testcase                             |
              +---->| async def test_with_ref(dut: DUTRandomGenerator): |
              |     |   await dut.generate()                            |
              |     |   ...                                             |
              |     +---------------------------------------------------+
              |
              |     +---------------------------------------------------+
              |     | @toffee_test.testcase                             |
              +---->| async def test_another(dut: DUTRandomGenerator):  |
              |     |   result = await dut.get_random()                 |
              |     |   ...                                             |
              |     +---------------------------------------------------+
              |
              |     +---------------------------------------------------+
              |     | @toffee_test.testcase                             |
              +---->| async def test_third(dut: DUTRandomGenerator):    |
                    |   await dut.setup()                               |
                    |   ...                                             |
                    +---------------------------------------------------+
By using Fixtures, we can effectively organize the preparation of the test environment, making the testcases themselves more concise and focused on the verification logic. For the scope of Fixtures (such as session and module level sharing), you can refer to the relevant documentation of pytest and Python.
2.2 Testcase Conventions
Generally speaking, files containing testcases need to follow:
Defined as asynchronous functions.
Files containing testcases should have a prefix of
test_or a suffix of_test.The name of each testcase (i.e., function or method) needs to have a
testprefix. For more specific rules, please refer to the pytest documentation.Each testcase must have a parameter with the same name as the fixture function, so that pytest can inject the result.
As the amount of verification code increases, using toffee and toffee-test can significantly improve verification efficiency and optimize the validation workflow experience.
3. Using Asynchronous Environments
In the previous toffee-test example code, we noticed that all function definitions had the async keyword prepended to them. This is because the core of the Toffee framework is an asynchronous programming model based on coroutines.
Hardware verification naturally involves massive concurrent activities and precise time synchronization. For example, we need to drive multiple DUT interfaces simultaneously, monitor various signals, wait for specific clock edges or events to occur, interact with reference models, and more. If we use traditional synchronous blocking programming (meaning a function call must wait for it to fully return before executing the next step), the code will be difficult to express this concurrency, or it will cause simulation inefficiency (because one waiting operation blocks all other activities). While callback functions can be used to handle asynchronous events, this often leads to fragmented control flow, easily falling into the so-called “callback hell,” making the code hard to read and maintain.
3.1 Asynchronous Functions
First, we need to understand two Python keywords, async and await, which form the basis for using coroutines.
The async keyword
When we add the async keyword before defining a function, this function becomes a coroutine function (also known as an “asynchronous function”, referred to uniformly as “asynchronous function” below):
async def my_coro():
    ...
However, calling the asynchronous function directly (e.g., my_coro()) does not immediately execute its inner code. Instead, it immediately returns a coroutine object. This coroutine object essentially acts like a “task pending execution” or an “execution plan”, containing the necessary information to run the coroutine, but it doesn’t run automatically by itself.
The await keyword
The await keyword can only be used inside an async def function. Its role is to execute and wait for a coroutine object to complete. When we use the await keyword within an asynchronous function, we can execute an asynchronous function and wait for it to finish running and return the result:
import asyncio

async def my_coro():
    return "my_coro"

async def my_coro2():
    result = await my_coro()
    """
    Equivalent to:
    coro_obj = my_coro()
    result = await coro_obj
    """
    print(result)

if __name__ == "__main__":
    asyncio.run(my_coro2()) # Execute my_coro2()
In the top-level regular (non-async) code, a mechanism like asyncio.run(coro_object) is needed to start the event loop and execute the coroutine object.
Note: In testcases decorated with
@toffee_test.testcaseused later on, the test framework will automatically handle the running of the event loop, usually eliminating the need to callasyncio.runmanually.
3.2 Achieving Concurrency
The reason using async def to define functions and await to call them can achieve a concurrent (or asynchronous execution) effect centers on the event loop and the coroutine mechanism.
The workflow is as follows:
async defmarks pausable: A function marked withasync defis a coroutine, indicating it might contain time-consuming or waiting operations inside, and it has the capability to pause execution at these points.awaittriggers pause and yields execution right: Theawaitkeyword marks the position where the coroutine pauses. Whenawaitis used on an asynchronous operation that cannot complete immediately (e.g., background I/O operations, sleeping for a certain time (sleep), or waiting for an event like hardware clock advancement (dut.AStep(1))), the current coroutine will pause here, returning control to the event loop so that it can schedule and execute other ready tasks. Note that not everyawaitcauses an immediate execution switch; execution first enters the awaited target, and only when a blocking operation requiring a wait is encountered inside will an actual pause and switch occur.Event loop takes over scheduling: The event loop is the core scheduler in the background. After reclaiming control, it checks other coroutine tasks and schedules ready (not-waiting) tasks to run on the current thread.
Switch to other tasks: The event loop selects a ready coroutine and executes it. This mechanism is the key to simulating hardware parallel behavior: in hardware simulation, simulation time advances and the internal state of hardware updates only when the “clock advancement” event occurs. Prior to this, all software operations are considered to finish in “zero time”, making it possible to prepare all parallel inputs for the hardware at a single simulation moment.
Event completion and resumption: When a certain awaited asynchronous operation eventually completes (e.g., clock cycles finish, signals change), the event loop is notified, marking the coroutine waiting on that event as runnable. At an appropriate time, the event loop will resume the execution of that coroutine, making it continue from right after the
awaitstatement where it previously paused.
In summary: async def defines a pausable unit; await triggers the pause and yielding. The event loop utilizes the timeslice yielded by coroutines to run other tasks and wakes up the original task when its waiting is over. This rapid task-switching based on waiting points forms the basis of coroutines realizing concurrency, allowing multiple tasks to execute interleavingly on a single thread and appearing to run simultaneously.
The following schematic helps understand this switching process:
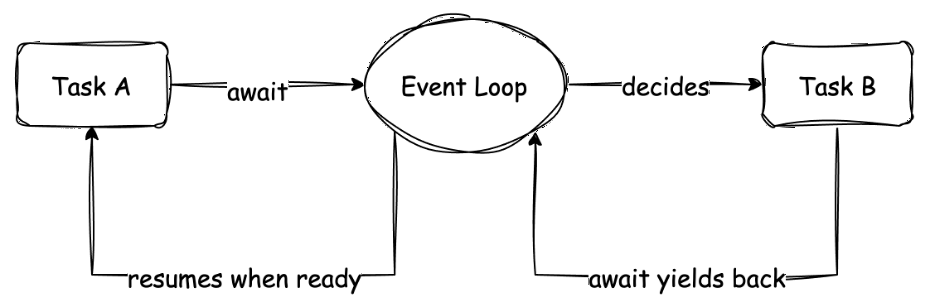
This diagram shows the execution flows of two coroutines (tasks A and B). Macroscopically, A and B seem to be parallel. Microscopically, when A needs to wait for an event, it yields control through await, and the Event Loop gives execution right to B. When B also encounters waiting, it might switch back to A (if A’s event has completed). This cooperative switching is the core of coroutine concurrency.
This concurrency achieved through await primarily reflects the waiting and switching inside a single task flow. For scenarios needing to launch multiple independently running, mutually non-waiting background tasks (for example, running multiple independent monitors or stimulus generators simultaneously), Toffee also provides other mechanisms to achieve this, which we will encounter in subsequent contents (e.g., toffee.create_task or Executor).
3.3 Managing DUT Clock
In traditional Verilog simulations or environments completely using Picker, we manually advance the clock cycle and update the DUT state by calling the dut.Step() method. However, in asynchronous verification scenarios requiring precise control over waiting for a specific number of clock cycles or waiting for a specific event to occur, merely relying on manual Step() isn’t flexible enough. We need a mechanism to drive the clock automatically and continuously, while allowing our test logic to wait for the passage of time through await.
Toffee provides the toffee.start_clock(dut) function to solve this problem. When you call start_clock(dut) (usually at the test environment initialization phase, such as within a Fixture), Toffee spawns a task in the background specifically responsible for driving the dut’s clock signal (the clock pin must be specified in advance through create_dut or InitClock). This task continuously toggles the clock signal according to the simulation time step, thereby driving the timing of the entire design forward.
start_clockKey Points
- Can only be called within asynchronous functions.
- The waveform will have an extra cycle of results; this is intentionally designed for the Monitor method discussed later.
A code example introducing start_clock to manage the clock and asynchronous await methods is as follows:
from RandomGenerator import DUTRandomGenerator
import random
import toffee
import toffee_test


class LFSR_16:
    def __init__(self, seed):
        self.state = seed & ((1 << 16) - 1)

    def Step(self):
        new_bit = (self.state >> 15) ^ (self.state >> 14) & 1
        self.state = ((self.state << 1) | new_bit) & ((1 << 16) - 1)


@toffee_test.testcase
async def test_with_ref(dut: DUTRandomGenerator):
    seed = random.randint(0, 2**16 - 1)
    dut.seed.value = seed
    ref = LFSR_16(seed)

    dut.reset.value = 1
    await dut.AStep(1)  # Wait for the clock to pass one cycle
    dut.reset.value = 0
    await dut.AStep(1)  # Update DUT state

    for i in range(65536):
        await dut.AStep(1)
        ref.Step()
        assert dut.random_number.value == ref.state, "Mismatch"


@toffee_test.fixture
async def dut(toffee_request: toffee_test.ToffeeRequest):
    rand_dut = toffee_request.create_dut(DUTRandomGenerator, "clk")

    toffee.start_clock(rand_dut)  # Let toffee drive the clock; can only be called in asynchronous functions
    return rand_dut
Through the coordination of start_clock and await AStep(), we decouple the test logic from clock advancement, making writing asynchronous verification sequences based on time more natural and clearer.
3.4 Other Asynchronous Waiting Methods
In addition to asynchronous waiting methods provided by the DUT class, toffee also provides some utility methods, for example:
AllValid: Waits until all incoming interfaces are high-level.Change: Waits for the pin signal to change.Condition: Waits for a condition to become true.Value: Waits for a pin signal to become the specified value.- …
For more complete information, please check the content about toffee.triggers.module in the API documentation.
Exercises
The exercises for this section have been published, please refer to [Learning Task 2: Toffee section] 1. Managing testcases with toffee-test.
⚠️ About Exercises
This lecture contains extensive content; you can do hands-on exercises as you finish reading each part of the text tutorial~
4. Encapsulating Ports with Bundle
The following content originates from: How to use Bundle
In complex chip designs, a DUT may contain a massive number of input and output ports. To effectively manage these ports and interact with other parts of the verification environment, we need an encapsulation mechanism.
The Bundle plays a vital role in the Toffee verification environment. It is primarily used for:
Interface Encapsulation and Abstraction: Encapsulate a set of related ports on the DUT (e.g., all signals of a bus interface) together to form a logical unit.
Decoupling Agent and DUT: Acting as a middle layer for the
Agent(introduced in the next section) to interact with the DUT, theBundlemakes writing theAgentindependent of the DUT’s specific port names and hierarchy, improving the reusability of verification components.Structured Access: Hierarchically divides the DUT interfaces, making access to specific ports clearer and more convenient.
4.1 Definition of a Simple Bundle
To define a Bundle, you need to customize a new class and inherit from the Bundle class in toffee. Below is an example of a Bundle definition for a simple adder interface:
from toffee import Bundle, Signals

class AdderBundle(Bundle):
    # Signals(N) defines N signals of the same name at once, typically used to define a group of signals.
    # Here we define 5 signals: a, b, sum, cin, cout
    a, b, sum, cin, cout = Signals(5)
In this AdderBundle class, we defined five signals: a, b, sum, cin, and cout. These signals logically correspond to the adder’s two inputs (a, b), output (sum), carry input (cin), and carry output (cout).
After definition is complete, you can instantiate the AdderBundle and access its contained signals:
from bundle.adder_bundle import AdderBundle

# Instantiate Bundle
adder_bundle = AdderBundle()

# Access and assign value to the signal's value attribute via the '.' operator
adder_bundle.a.value = 1
adder_bundle.b.value = 2
adder_bundle.cin.value = 0

# Wait for the clock to advance one cycle, updating pin signals
await self.adder_bundle.step()

# Read signal values
print(adder_bundle.sum.value)
print(adder_bundle.cout.value)
```> ⚠️Warning: <font color="red">**It is not recommended** to override the constructor of Bundle </font>, unless you are very familiar with the implementation of Bundle's code!

## 4.2 Binding DUT to Bundle

Merely creating a `Bundle` instance and operating on it cannot affect the actual hardware design (DUT). We need to "bind" the `Bundle` with the ports of the DUT to establish a connection.

The `bind` method is used to bind a `Bundle` instance to a DUT object. Suppose we have an adder DUT class instance `adder` named `DUTAdder`, whose port names exactly match the signal names defined in `AdderBundle`:

```python
# Assume DUTAdder is a class representing the hardware design of an adder
# adder = DUTAdder()

adder_bundle = AdderBundle()
# Bind adder_bundle to the adder DUT instance
adder_bundle.bind(adder)
After executing bind(adder), Toffee will automatically find ports in the adder object that have the same names as the signals defined in adder_bundle and connect them. From then on, assignment operations to adder_bundle.a will actually drive the a port on adder.
4.3 Handling Port Name Mismatches
In an actual project, the port naming of the DUT is often different from the ideal names we defined in Bundle. For example, the DUT may follow specific naming conventions, such as adding prefixes, suffixes, or using different naming styles. Bundle provides a variety of flexible binding strategies to handle this situation.
Note: The following
from_prefix,from_regex, andfrom_dictare all Class Methods. They are used to createBundleinstances before callingbind, and to configure the name matching rules that the instance should follow during subsequent binding.
Binding by Prefix
Suppose the DUT port names all have an added io_ prefix compared to the Bundle signal names:
(Bundle -> DUT)
a       -> io_a
b       -> io_b
sum     -> io_sum
cin     -> io_cin
cout    -> io_cout
We can use the from_prefix method to create a Bundle instance and tell it to match DUT ports with the io_ prefix when binding:
# Create DUT
adder = DUTAdder()
# Specify prefix matching rules when creating the Bundle instance
adder_bundle = AdderBundle.from_prefix('io_')
# Perform binding, it will automatically look for ports like io_a, io_b on the DUT
adder_bundle.bind(adder)
Binding by Regular Expression
Sometimes the name mapping relationship is more complicated, for example, containing direction information:
(Bundle -> DUT)
a       -> io_a_in
b       -> io_b_in
sum     -> io_sum_out
cin     -> io_cin_in
cout    -> io_cout_out
In this case, you can use regular expressions to extract the original name defined in Bundle. Create a Bundle via the from_regex method, providing a regular expression that includes capture groups:
adder = DUTAdder()
# The regular expression r'io_(.*)_.*' captures the part between underscores
adder_bundle = AdderBundle.from_regex(r'io_(.*)_.*')
adder_bundle.bind(adder)
When binding, Toffee will:
Try to match each port name of the DUT with the regular expression
r'io_(.*)_.*'.If the match is successful (for example,
io_a_in), extract the content of all capture groups in the regular expression (here it isa).Match the captured content (
a) with the signal names defined inBundle.If the match is successful, bind the DUT port
io_a_into theBundlesignala.
Binding by Dictionary
The most direct way is to provide an explicit mapping dictionary specifying the exact correspondence from Bundle signal names to DUT port names:
(Bundle -> DUT)
a       -> a_in
b       -> b_in
sum     -> sum_out
cin     -> cin_in
cout    -> cout_out
Create a Bundle with the from_dict method and pass in the mapping dictionary:
adder = DUTAdder()
adder_bundle = AdderBundle.from_dict({
    'a': 'a_in',
    'b': 'b_in',
    'sum': 'sum_out',
    'cin': 'cin_in',
    'cout': 'cout_out'
})
adder_bundle.bind(adder)
When bind is called, it will strictly follow the dictionary to find the corresponding DUT port for binding.
4.4 Creating Sub Bundles
Complex interfaces can often be decomposed into several sub-interfaces. Bundle supports nesting, allowing one Bundle to be defined as a member of another Bundle (a sub-bundle), thereby building a hierarchical interface description.
from toffee import Bundle, Signal, Signals

class AdderBundle(Bundle):
    a, b, sum, cin, cout = Signals(5)

class MultiplierBundle(Bundle):
    a, b, product = Signals(3)

class ArithmeticBundle(Bundle):
    # Signals contained within itself
    selector = Signal()

    # Treat AdderBundle as a sub Bundle named adder
    # and specify that it needs to match DUT ports prefixed with 'add_' when binding
    adder = AdderBundle.from_prefix('add_')

    # Treat MultiplierBundle as a sub Bundle named multiplier
    # and specify that it needs to match DUT ports prefixed with 'mul_' when binding
    multiplier = MultiplierBundle.from_prefix('mul_')
In ArithmeticBundle, we define a selector signal selector, and encompass instances of AdderBundle and MultiplierBundle, named adder and multiplier respectively. Accessing signals within sub-Bundles uses the . operator:
arithmetic_bundle = ArithmeticBundle()

arithmetic_bundle.selector.value = 1
arithmetic_bundle.adder.a.value = 1       # Access signal a of sub Bundle adder
arithmetic_bundle.adder.b.value = 2
arithmetic_bundle.multiplier.a.value = 3  # Access signal a of sub Bundle multiplier
arithmetic_bundle.multiplier.b.value = 4
Binding behavior: When the bind operation is performed on the top-level Bundle (ArithmeticBundle), the sub Bundles it contains will also be recursively bound to the DUT. The name matching rules of the sub Bundle (such as from_prefix('add_')) will take effect on the namespace processed by the parent Bundle’s matching rules.
For example, if ArithmeticBundle itself was created like this: ArithmeticBundle.from_prefix('io_'), and there is a port called io_add_a on the DUT:
The
from_prefix('io_')rule of the top-levelArithmeticBundletemporarily mapsio_add_atoadd_a.Then, the
from_prefix('add_')rule of the subBundleadderapplies toadd_a, mapping it toa.Finally, the DUT port
io_add_ais bound toarithmetic_bundle.adder.a.
Dictionary and regular expression matching methods will similarly pass their processed (mapped or captured) names to the sub Bundle for further matching.
4.5 Utility Operations in Bundle (Excerpt)
Signal Access and Assignment
Accessing Signal Values
In addition to the . operator, you can also use the [] operator to access signals via string names:
adder_bundle = AdderBundle()
adder_bundle['a'].value = 1
Assigning All Signals Simultaneously
All input signals can be changed to a certain value simultaneously via the set_all method.
adder_bundle.set_all(0)
Changing Signal Assignment Mode
Bundle supports changing the assignment mode of the entire Bundle through set_write_mode.
At the same time, Bundle provides quick configuration methods: set_write_mode_as_imme, set_write_mode_as_rise, and set_write_mode_as_fall, which are used to set the Bundle’s assignment mode to immediate assignment, rising edge assignment, and falling edge assignment, respectively.
The default signal assignment mode of Bundle is Rising Edge Write Mode (Rise).
Message Support (Dictionary Operations)
Default Message Type Assignment (assign)
You can quickly assign values to multiple signals in a Bundle with a dictionary using the assign method:
adder_bundle.assign({
    'a': 1,
    'b': 2,
    'cin': 0
})
Using '*' can set default values for signals not explicitly specified in the dictionary:
adder_bundle.assign({
    '*': 0,
    'a': 1,
})
Default Message Assignment Support for Sub Bundles
When multilevel=True for assign, nested dictionary assignment can be used:
arithmetic_bundle.assign({
    'selector': 1,
    'adder': {
        '*': 0,
        'cin': 0
    },
    'multiplier': {
        'a': 3,
        'b': 4
    }
}, multilevel=True)
When multilevel=False (default), use the . symbol to specify sub Bundle signals:
arithmetic_bundle.assign({
    '*': 0,
    'selector': 1,
    'adder.cin': 0,
    'multiplier.a': 3,
    'multiplier.b': 4
}, multilevel=False)
Default Message Type Reading
The as_dict method will convert the current signal values of the Bundle into a dictionary. It similarly supports the multilevel parameter to control the output format (nested dictionary or flat dictionary):
> arithmetic_bundle.as_dict(multilevel=True) # Outputs a nested dictionary
{    'selector': 1,
    'adder': {
        'a': 0,
        'b': 0,
        'sum': 0,
        'cin': 0,
        'cout': 0
    },
    'multiplier': {
        'a': 0,
        'b': 0,
        'product': 0
    }
}
> arithmetic_bundle.as_dict(multilevel=False) # Output flat dictionary
{
    'selector': 1,
    'adder.a': 0,
    'adder.b': 0,
    'adder.sum': 0,
    'adder.cin': 0,
    'adder.cout': 0,
    'multiplier.a': 0,
    'multiplier.b': 0,
    'multiplier.product': 0
}
Custom Message Types
If you have a custom data structure (class) that you want to use for interaction with Bundle:
Assigning to a Bundle:
Implement the
as_dict()method in your custom class to return a dictionary, then usebundle.assign(my_message.as_dict()).Implement the
__bundle_assign__(self, bundle)method in your custom class to directly complete the assignment to thebundlesignals within this method. Then you can directly callbundle.assign(my_message), and Toffee will automatically call__bundle_assign__.
class MyMessage:
    def __init__(self):
        self.a = 0
        self.b = 0
        self.cin = 0

    def __bundle_assign__(self, bundle):
        bundle.a.value = self.a
        bundle.b.value = self.b
        bundle.cin.value = self.cin

my_message = MyMessage()
adder_bundle.assign(my_message)
- Reading values from a Bundle: When you need to convert signal values in a Bundle into a custom message structure, you can implement a class method
from_bundle(cls, bundle)in your custom class, which is used to read signal values from thebundleand create an instance of that class.
class MyMessage:
    def __init__(self):
        self.a = 0
        self.b = 0
        self.cin = 0

    @classmethod
    def from_bundle(cls, bundle):
        message = cls()
        message.a = bundle.a.value
        message.b = bundle.b.value
        message.cin = bundle.cin.value
        return message

my_message = MyMessage.from_bundle(adder_bundle)
Asynchronous Support
In a Bundle, in order to conveniently receive clock information, a step function is provided. When a Bundle is connected to any signal of the DUT, the step function automatically synchronizes with the DUT’s clock signal.
You can wait for a clock cycle by using the step function.
async def adder_process(adder_bundle):
    adder_bundle.a.value = 1
    adder_bundle.b.value = 2
    adder_bundle.cin.value = 0
    await adder_bundle.step()
    print(adder_bundle.sum.value)
    print(adder_bundle.cout.value)
class SomeExample(Bundle):
    ...
    async def operation(value):
        ...
        await self.step(1)
        ...
4.6 Summary
Bundle is the foundation of interaction with DUT ports in Toffee. It provides powerful encapsulation, binding, and operation capabilities. Being proficient in using Bundle is the first step in building a robust verification environment. For more detailed features, please refer to the official Toffee documentation.
4.7 Exercises
The exercises for this section have been published, please refer to 【Learning Task 2: Toffee Part】 2. Encapsulate DUT with Bundle.
5. Further Encapsulation with Agent
While Bundle solves the interaction problem at the signal level of DUT ports, operating Bundle signals directly in test cases remains relatively low-level. Agent provides a higher level of abstraction in Toffee; it typically encapsulates one or more Bundles and defines Transaction-Level operations related to these interfaces.
The primary goals of an Agent are:
Abstracting operations: Encapsulating low-level signal operations (like handshake protocols) into meaningful transactions (like
read_transaction,write_data).Separation of driving and monitoring: Clearly dividing the logic of actively initiating operations (driving) and passively observing behaviors (monitoring).
Simplifying test cases: Enabling top-level verification code to focus more on test scenarios and data, rather than specific signal timing.
By encapsulating behavior into functions via an Agent, the upper layer only needs to focus on how to call the functions.
An Agent generally consists of two core types of methods:
Driver Method: Actively initiates operations to the DUT by controlling
Bundlesignals. It usually has parameters (input data/configuration) and a return value (operation result/read data).Monitor Method: Passively observes
Bundlesignals, captures activities or states on the interface when specific conditions are met, and may generate transaction objects or data representing that activity.
5.1 Initializing an Agent
To define an Agent, you need to create a new class inherited from the Toffee Agent base class:
from toffee import Agent

class AdderAgent(Agent):
    ...
When initializing an AdderAgent class, the Bundle that this Agent needs to drive must be passed externally, for example:
adder_agent = AdderAgent(adder_bundle)
If an Agent needs to operate multiple Bundles (such as the read and write interfaces of a FIFO), you can override the constructor to receive multiple Bundles, but you must pass one of them to super().__init__ because this Bundle is primarily used to allow the Agent to synchronize with the simulation clock using the step() method.
Taking the previously practiced SyncFIFO as an example:
from toffee.agent import Agent

class FIFOAgent(Agent):
    def __init__(self, read_bundle, write_bundle):
        # Pass read_bundle to the parent class to get the clock
        super().__init__(read_bundle)
        # Save both Bundle instances
        self.read = read_bundle
        self.write = write_bundle
        ...
    ...
5.2 Creating Driver Methods
A driver method is an asynchronous function (async def) in an Agent used to actively execute operations. It is responsible for parsing input parameters, operating Bundle signals according to specific timing, and possibly returning the operation results.
Must be decorated with the
@driver_method()decorator.Accesses and operates signals via
self.bundle(or other saved Bundle members).Use internally defined member variables to access signals and control the clock.
Use internally defined Bundles to access signals.
Use
await self.bundle.step()(orawait self.monitor_step()) to wait for a clock cycle.
Can return the operation result using the
returnstatement.
Below is an example of a simple driver method for AdderAgent:
from toffee.agent import *

class AdderAgent(Agent):
    @driver_method()
    async def exec_add(self, a, b, cin):
        """Execute one addition operation"""
        self.bundle.a.value = a
        self.bundle.b.value = b
        self.bundle.cin.value = cin
        # Wait for one clock cycle
        await self.monitor_step() # Equivalent to self.bundle.step()
        # Read and return the result
        return self.bundle.sum.value, self.bundle.cout.value
In verification code, you can call a driver method just like a regular asynchronous function:
adder_bundle = AdderBundle()
adder_agent = AdderAgent(adder_bundle)
sum, cout = await adder_agent.exec_add(1, 2, 0)
print(sum, cout)
Tip: For methods marked with the
@driver_methoddecorator, in addition to executing the logic we define, the Toffee framework will handle some extra processing automatically, such as interacting with a Reference Model and comparing results (this part will be introduced in subsequent chapters).
5.3 Creating Monitor Methods
Monitor methods are used to passively observe activity on a Bundle interface. They are also asynchronous functions (async def) and are automatically and periodically called by the framework.
Must be decorated with the
@monitor_method()decorator.The framework will automatically call all monitor methods at a specific stage of every clock cycle (see the timing section later).
The internal logic of a monitor method usually checks whether
Bundlesignals meet specific conditions (for example, whether an enable signal is valid, or a handshake is completed).Key point: In a given call, if a monitor method considers a valid activity/transaction to be captured, it should return the data representing that activity (e.g., a dictionary, a custom transaction object, etc.). If the return value is not
None, the framework considers an event to have been monitored and pushes the return value into the internal message queue. If it returnsNone, it means no target event was monitored in this cycle.If the execution logic of the monitor method needs to span multiple clock cycles (such as waiting for a complete transfer to finish), the framework will wait for its completion before making the next call.
Below is an example of a simple monitor method used to monitor when the adder output sum is greater than 0:
from toffee.agent import *
class AdderAgent(Agent):
    @monitor_method()
    async def monitor_sum(self):
        # Check condition
        if self.bundle.sum.value > 0:
            # Condition met, return the current state of the Bundle as the monitored data
            # Use as_dict() to get a dictionary containing all signal values
            return self.bundle.as_dict()
        # Condition not met, return None (or don't return anything)
This monitor_sum method will be called by the framework every cycle. If sum is greater than 0, it will return a dictionary containing all signal values at that time; otherwise, it returns None.
If you want to unconditionally capture the Bundle state every cycle, you can write it like this:
@monitor_method()
async def monitor_always(self):    return self.bundle.as_dict(multilevel=False)
5.4 Fetching Monitored Messages
When a method marked with @monitor_method runs automatically, its non-None return values are placed into an internal message queue with the same name as the method. To fetch these monitored data in test cases, you need to perform the following steps:
- Start the monitoring queue: Before the test begins (usually in a fixture), start the queue for the monitoring method whose messages need to be fetched, and specify the queue size:
adder_agent.start_monitor("monitor_sum", 10) # Specifies the size of the message queue, default size is 4
- Check queue size (Optional): You can use
monitor_size("method_name")to get the number of messages currently in the queue.
message_count = adder_agent.monitor_size("monitor_sum") # Gets the number of messages in the message queue
- Fetch message: In the test case, call the
Agentmethod with the same name as the monitoring method to fetch a message from the queue. This is an asynchronous operation; if the queue is empty, it will wait until a message enters.
result = await adder_agent.monitor_sum()
Monitoring methods are also associated with the reference model, and the framework automatically compares the monitored data with the reference model’s expectations (introduced in later chapters).
5.5 Timing in Agent
Driver methods and monitoring methods in Agent follow these basic timing rules:
Monitoring prioritised: At the beginning of each clock cycle, the framework will first call all monitoring methods. Only after all monitoring methods (called in this cycle) have finished executing will the driver methods (if called by the verification code in this cycle) be executed.
Start and End: Driver methods can be called in the 0th clock cycle. Monitoring methods are automatically called by the framework starting from the beginning of the 1st clock cycle. At the end of the entire testing process, monitoring methods are called one extra time to ensure the state of the final cycle is captured.
The diagram below shows the timing for executing a 5-time single-cycle driver method exec_add:
            cycle 0       cycle 1            cycle 2          cycle 3          cycle 4          cycle 5
test start ---------+-----------------+-----------------+-----------------+-----------------+----------------- test end
                    |                 |                 |                 |                 |
            +---------------+ +---------------+ +---------------+ +---------------+ +---------------+
            |    exec_add   | |    exec_add   | |    exec_add   | |    exec_add   | |    exec_add   |
            +---------------+ +---------------+ +---------------+ +---------------+ +---------------+
                    | +-------------+ | +-------------+ | +-------------+ | +-------------+ | +-------------+
                    | | monitor_sum | | | monitor_sum | | | monitor_sum | | | monitor_sum | | | monitor_sum |
                    | +-------------+ | +-------------+ | +-------------+ | +-------------+ | +-------------+
                    |                 |                 |                 |                 |
           ---------+-----------------+-----------------+-----------------+-----------------+-----------------
5.6 Complete Agent Example
Combining driver and monitoring methods, the complete code for AdderAgent is as follows:
# Code located at https://github.com/XS-MLVP/toffee/blob/master/example/adder/env/agent.py
class AdderAgent(Agent):
    @driver_method()
    async def exec_add(self, a, b, cin):
        self.bundle.a.value = a
        self.bundle.b.value = b
        self.bundle.cin.value = cin
        await self.bundle.step()
        return self.bundle.sum.value, self.bundle.cout.value

    @monitor_method()
    async def monitor_once(self):
        return self.bundle.as_dict()
5.7 Exercises
The exercises for this section have been published, please refer to 【Learning Task 2: Toffee Section】 3. Further Encapsulation using Agent.
6. Synchronous FIFO Specification Reading
You need to read the synchronous FIFO specification, specifically see:
Synchronous FIFO Design Specification
Objectives of this Section
This subsection is designed to help verification newcomers learn how to quickly read and understand chip or hardware design specification documents, and to extract the key points of verification work from them. Through the example of the SyncFIFO module, it will guide you step-by-step to master:
How to identify module functions and purposes
How to understand interfaces and the meanings of signals
How to analyze module internal behaviors
How to extract key verification points and boundary conditions
Recommended Reading Order: The Five-Step Method
The so-called five-step method is essentially understanding the verification document from five dimensions. It requires you to bring these five questions with you before reading, and look for answers to them one by one in the article.
By doing this, you can transform the reading and understanding of the document into five questions, using a problem-solving approach to understand the document; when you are sure you can answer these questions correctly, you can be said to have a thorough understanding of the hardware specification design.
1. Understand the Role and Purpose of the Module
What is the module? What does it want to achieve?
- The purpose of this step is to help us form a macroscopic understanding of the module.
How to do it specifically?
The beginning of a specification document usually has a general description, from which you can learn the background story of the module to be verified. In the case of the synchronous FIFO, you can refer to the
Descriptionsubsection, which describes this part of the content. Obviously, FIFO is a well-known data structure, just hearing this name can immediately build a sense of familiarity.In the rest of the content introduction, you can learn about its general functions, application scenarios, specifications, and whether it follows synchronous or asynchronous operations. This part of the content may further deepen your understanding of the background story, but if it happens to make you feel unfamiliar, don’t panic. You will find the answers you want in the subsequent reading; the important thing is that we have at least built a macroscopic understanding of the background story in the previous step.
It should be noted that not all modules are as familiar to us as FIFO, requiring no further explanation. In many cases, you need to establish a macroscopic understanding by reading the background introduction.
2. Clarify Input and Output Signals
- What do the input and output signals represent? What is the synergistic relationship between input and output signals?
- The interface is the only way for the module to communicate with the outside world. Understanding the interface means understanding the module’s behavior.
How to do it specifically?
Interface signals are mainly divided into three major categories: input signals, output signals, and control signals (which actually also belong to input signals, but have special functions, so they are listed specifically here). Using the Port Description in FIFO as an example below, please categorize and understand the meanings of the FIFO ports yourself:
Control signals: Used to control the entire module
Clock signal:
clkReset signal:
rst_n
Input signals:
Write signals:
Write data signal:
data_iWrite control signal:
we_i
Read signals:
- Read control signal:
re_i
- Read control signal:
Output signals:
Read data signal:
data_oOutput status signals:
full_o,empty_o
💡Hint: This categorization method is not mandatory, you can categorize according to personal preference, for example, read/write enable signals can be categorized into control signals
After understanding the meaning of each input and output signal, next, we also need to figure out the combination/synergistic relationship between input and output signals:
In the example above, the synergistic relationship between the signals has actually surfaced:
The write signal in the input signals synergizes the writing of the signal
The read control signal in the input signals controls the reading of the read data signal in the output signals
3. Understand Module Internal Logic
How does it work inside the module? What is the logic?
- In the previous step, we learned how signals interact externally. Next, we go deep inside to understand exactly what the module does internally.
How to do it specifically?
From here on, we need to specifically understand the internal logic of the module (referring to the
Functional Descriptionof the FIFO). We need to extract the internal behaviors and detail them into specific points. For a module, its behavioral logic is nothing more than module control of top-level signals, module updates, and module reads. We can extract from these perspectives:Control of top-level signals
- Reset: Based on the reset signal, reset the internal signals in the synchronous FIFO
Module updates:
Internal data update: Store data into the synchronous FIFO via write operation (corresponding to the Write Operation part of the functional description)
Internal state update: Internal state signal updates caused by input signals (including control signals), for example, a write operation causes a counter change (corresponding to the Counter part of the functional description). Reading or writing will trigger a pointer update.
Module reads:
Internal data read: Read the stored data from the synchronous FIFO via read operation (corresponding to the Read Operation part of the functional description)
Internal state read: Record the data capacity stored in the synchronous FIFO through the counter (corresponding to the Counter part of the functional description)
4. Identify Extreme or Boundary Behaviors
What to do in extreme situations? Can the module “hold up”?
- When you complete the previous three steps, you can already relatively well understand the rough design of the module. Now we need to specifically consider some extreme situations, or boundary conditions
How to do it specifically?
This part of the content might need to be summarized by yourself from the functional points, but in the
FIFOcase, we directly provided theBoundary Conditionssection.Common boundary conditions include the following types:
Data boundaries: E.g., whether the maximum and minimum values of the written data are valid.
Control signal boundaries: E.g., continuing to write when the FIFO is full, or reading when it is empty (the control signal here does not refer to the top-level control signal mentioned earlier, but the control signal that drives the execution of a certain function like:
re_iwe_i)Interaction boundaries: When multiple signals act simultaneously, can the module execute correctly?
When
we_i = 1 & re_i = 1, can the module handle read and write requests simultaneously? (Typical scenario: simultaneous read-write FIFO)When
we_i = 1 & rst_n = 0, is the write request ignored?
5. Organize Verification Goals and Establish a Verification Plan
Translate everything understood into actionable verification tasks: The previous four steps are already enough to completely understand the entire module. This next step requires us, on this basis, to think about how to establish a rough verification plan, which requires us to pay attention to more detailed content in the document.
How to do it specifically?
What this step needs to do is actually precisely to decompose the test points based on the functional points, and provide the corresponding coverage points. In the
FIFOcase, we directly provided theFunctional Points and Test Pointssection, which is very worthy of reference.Regarding how to divide the test points, we elaborated in detail in Lecture 1.
It is important to note that when reading specifications using this five-step method, it is not necessarily executed sequentially, it is very likely that sometimes it needs to be executed in parallel. For example, when first looking at the port list, you might not understand the meaning of the ports literally, and only after reading the functional points can you look back and understand it.
7. Collecting Functional Coverage
“If you can’t measure it, you can’t improve it.” — Peter Drucker
In chip verification, simply running test cases and passing (i.e., no assert failures) is far from enough. “Passing the tests” does not mean there are no defects in the design. We need a way to quantify verification progress and completeness. Coverage is the key metric used for this purpose.
Previous chapters have covered code coverage, such as line coverage, branch coverage, and state machine coverage. Code coverage measures the proportion of the design’s source code (RTL code) that is executed during simulation. It is very helpful for finding parts of the design that are never touched by any tests (so-called “dead code” or areas that test stimuli cannot reach).
However, 100% code coverage does not equal 100% functional verification. Imagine a simple adder, all its code lines might have been executed in tests, but we might have never tested the case of adding two negative numbers, or never triggered the scenario of addition overflow. These critical functional points or boundary conditions cannot be directly reflected by code coverage.
Functional coverage exactly makes up for this deficiency. It measures whether the functional points, operation modes, critical parameter combinations, state transitions, and boundary conditions defined in the design specification have actually been observed or experienced during the verification process. Functional coverage is directly linked to the verification plan, aiming to answer the core question: “Have all the functional scenarios we planned to verify really been covered by the tests?”
7.1 Functional Coverage Model
Before delving into its components, let’s first define what a functional coverage model is.
A functional coverage model is the specific code implementation for covering the test points in the verification plan. It’s not an abstract concept, but rather a set of code structures you write in a verification environment (for example, using the Toffee framework), whose purpose is:
Define “events of interest”: Explicitly specify which design behaviors, which signal values or combinations of values, and which state transitions are important, all of which stem from the design specification and verification plan.
Monitor simulation activity: While the simulation runs, the model continuously observes the DUT’s behaviors and states.
Record coverage: When an “event of interest” defined by the model occurs, the model records it (usually by marking the corresponding “coverage bin” as hit).
Quantify functional verification progress: By counting how many predefined events have been observed, it measures the verification’s degree of coverage for the design functions.
In a nutshell, a functional coverage model is like a checklist based on functional requirements that is dynamically executed during the simulation process. This checklist is written by the verification engineer based on the design specification, used to confirm if all the functional scenarios of concern have appeared in the tests. In Toffee, this “checklist” is built using elements like CovGroup, CovPoint, and CovBin, which will be introduced next.
7.2 Components of Functional Coverage
In Toffee (as well as languages like SystemVerilog), collecting functional coverage typically involves the following core elements:1. Coverage Group (CovGroup): A logical container used to organize a group of related coverage items. Usually it corresponds to a high-level functional point in the verification plan (for example, “FIFO basic read/write operations”) or an interface.
Coverage Point (
CovPoint): Defined within aCovGroup, it is used to monitor a specific behavior, variable value, or a combination of variable values of the design. It specifies what we want to measure (for example, “the value of the FIFO counter”, “the state during a write operation”).Coverage Bin (
CovBin): Defined within aCovPoint, it represents specific numerical values, value ranges, state transitions, or conditions that the coverage point needs to cover. It specifies the specific states expected to be achieved by the coverage point. When the condition defined by a Bin is observed in the simulation, that Bin is considered “covered”.
Goal: The goal of functional verification is usually to achieve 100% functional coverage, meaning all CovBin defined in the coverage model are hit at least once. Any uncovered Bin indicates a “blind spot” in the verification, prompting us to add new test cases or adjust existing stimulus generation strategies to cover these missing scenarios.
7.3 Building a Functional Coverage Model: Basic Principles
Developing a functional coverage model is not a one-time task, but a process that requires careful planning and iterative refinement. It heavily relies on the understanding of the design specifications and the development of the verification plan. Below are some key principles:
1. Based on Functional Requirements and Verification Plans
The functional coverage model must be derived from the design specifications and the verification plan. Every functional point, feature, state, or scenario listed in the verification plan that needs to be verified should have a corresponding CovGroup or Coverpoint in the coverage model to measure its coverage status. This ensures that the verification work is always focused on the expected functions of the design.
2. Based on Observation Data
The verification environment can typically be divided into:
Stimulus/Control Path: Responsible for generating input signals to drive the DUT.
Response/Analysis Path: Responsible for observing the output signals of the DUT, checking its behavior, and performing data analysis.
Functional coverage collection points should be located in the analysis path. That is, the coverage model should sample and record the actual behavior and states exhibited by the DUT (usually obtained through an Agent or Monitor monitoring the interface), rather than sampling the data sent to the DUT on the stimulus side.
Reason: If sampling is based on the stimulus side, when there are issues with the DUT or the stimulus itself (for example, the DUT does not respond correctly to the stimulus, or the stimulus sends incorrect data), the coverage data may be misleading, reporting that a certain function has been “covered” while the DUT actually did not execute the function as expected. Sampling based on observing the actual output of the DUT up ensures the coverage reflects the true design behavior.
Therefore, when building a verification environment, functional coverage needs to be constructed by analyzing the content of transactions. This places the following requirements on the design of the verification environment and analysis transactions:
Separation of Observation and Stimulus: The coverage model must be independent of the stimulus generation logic and rely only on the actual output of the DUT.
Integrity of Analysis Transactions: It is necessary to ensure that the transaction data completely records the response states of the DUT (such as signal values, timing, etc.).
Coverage-Driven Verification: Engineers need to analyze the existing coverage data to guide subsequent stimulus generation.
3. Designed for Analysis
Functional coverage reports are for verification engineers to read. A well-designed coverage model should not only accurately measure the coverage status but also be easy to understand and analyze. When a coverage hole appears, engineers need to be able to quickly locate which specific case of which functional point was not covered.
Clear Naming: Use descriptive and easy-to-understand names for
CovGroup,Coverpoint, andBin. For example,fifo_state_covgroup,counter_value_cp,bin counter_is_zero.Reasonable Organization: Organize related coverage points in the same
CovGroup.Leverage Language Features: Use features provided by Toffee (such as naming of Bins) to improve the readability of the report.
Investing time in the model design phase to optimize its structure and naming can save a lot of time later when analyzing coverage reports.
4. Determine the Appropriate Level of Detail
It is necessary to balance the matching accuracy of the coverage model with the design implementation and the degree of abstraction:
Matching Accuracy: How detailed does the model need to reflect the internal state or interface signals of the design?
Abstraction Level: To what extent can the details be abstracted or simplified?
For example, for a 32-bit address bus, it is unrealistic to create a Bin for every possible address value. A more appropriate approach is to define some key Bins, such as:
Boundary values: address 0, maximum address value.
Specific areas: the start and end address range of a certain memory region.
Alignment: check even/odd address access.
Some random sample values. This requires abstraction to summarize infinite possibilities into finite, representative coverage targets.
For several flag bits in a configuration register, it might be necessary to cover all $2^N$ combinations of them.
5. Key Considerations for Coverage Points and Bins
When defining coverage points and coverage bins, it is necessary to consider:
Which values are important?
Identify key values, states, or patterns required in the design specifications or that may trigger special behaviors.
For example: FIFO empty, full, half-full states; specific opcodes; error status bits.
Are there boundary conditions?
Focus on boundaries of numerical ranges (minimum, maximum, zero values), critical points of state transitions, and extreme cases of protocol timing.
For example: before and after a counter overflows; buffer just full/empty; timer timeouts.
Are there dependencies between data?
If a combination of states of multiple signals or variables makes sense, or their combination affects design behavior, Cross Coverage needs to be defined.
For example: cover a read operation (
re_i=1) occurring when the FIFO is not empty (empty_o=0); cover specific combinations of configuration bits.
Are there illegal or undesired conditions?
illegal_binscan be defined to capture states or combinations that should not happen according to the design specifications. If anillegal_binis hit, it usually indicates a design error or a verification environment error.For example: FIFO simultaneously reports full (
full_o=1) and empty (empty_o=1).
Are there conditions to ignore or not care about?
ignore_binscan be used to exclude conditions that, although possible, are unimportant or invalid for the current verification goal.For example: signal values during reset; logically impossible combinations in some cross coverage.
Priorities and Phased Goals:
Not all coverage points are equally important.
Set priorities for coverage points based on the verification plan. Prioritize ensuring P1 level coverage points reach 100%, and then gradually focus on P2 and P3.
6. Determine the Correct Sampling Timing
Choosing the correct sampling moment is crucial, as incorrect sampling may lead to invalid or omitted coverage data. The sampling point needs to satisfy:
Related Checks Passed (Optional but Recommended): It is best to sample coverage after confirming the DUT’s behavior is correct, to avoid recording coverage under erroneous behavior.
Data Valid: Ensure that at the sampling moment, the signal values of interest are stable and meaningful. For example, in a bus protocol, sampling is usually done in the cycle where the handshake signal confirms the transfer is completed.
Data Stable: Avoid sampling at moments when signals are transitioning.
7. Ensure the Sampling Result is Valid
It is necessary to consider scenarios where, even if sampling conditions are met, the sampling should be considered invalid or treated specially. For example:
The DUT is still in a reset state.
The operating mode has just changed, requiring a few cycles for the state to stabilize.
An error injection test is underway, and coverage at this time may need to be counted separately from normal operation coverage.
These situations can be handled by adding additional conditional logic in the sampling execution.
7.4 Collecting Functional Coverage in Toffee
Toffee provides classes and methods related to functional coverage through the toffee.funcov module.
Defining Coverage Groups (CovGroup) and Coverage Points (add_watch_point)
- Create a Coverage Group:
from toffee.funcov import CovGroup
from agent.fifo_agent import FIFOAgent # Assuming FIFOAgent exists

def get_cover_group_fifo_state(agent: FIFOAgent) -> CovGroup:
    # Create a coverage group named "FIFO state"
    group = CovGroup("FIFO state")
    # ... add coverage points here ...
    return group
Add Coverage Points: Use the group.add_watch_point() method. This method requires:
Watch Object: The signal or
Bundleinstance to be monitored (for exampleagent.internal.counter,agent.write,agent.internal).Bins Dictionary: A dictionary defining all the Bins for this coverage point.
Key: The name of the Bin (string).
Value: The logic defining the hit condition of the Bin. It can be:
Comparison function: such as
CovEq(1),CovIsInRange(7, 9), etc., used to check the value of the watch object.Check function: A function (regular function or lambda) that takes the watch object as a parameter and returns
True(hit) orFalse(miss).
nameParameter: The name of the coverage point, used for reporting.
Coding Techniques
Checking the Value of a Single Signal
It is convenient to use the comparison functions provided by toffee.funcov: CovEq, CovGt, CovLt, CovGe, CovLe, CovNe, CovIn, CovNotIn, CovIsInRange. For example, if we want to detect the value of counter in a synchronous FIFO:
def get_cover_group_fifo_state(agent: FIFOAgent) -> CovGroup:
    # Create coverage group
    group = CovGroup("FIFO state")
    # Add coverage points
    ...
    # Detect the counter signal
    group.add_watch_point(agent.internal.counter, {
        "one": CovEq(1),
        "middle": CovIsInRange(7, 9), # The value of counter is between 7 and 9
        "near_full": CovIsInRange(14, 15),
    }, name="counter")
    return group
Checking Conditions Involving Multiple Signals
When a Bin’s condition involves multiple signals or more complex logic, a check function needs to be provided.
Lambda Expressions
For simple conditions, the most direct way to write it is using a Lambda expression.
Named Functions
It is more recommended to use named functions, which not only have better maintainability but also provide IDE code completion support when coding:
from toffee.funcov import CovGroup
from agent.fifo_agent import FIFOAgent
from bundle.fifo_bundle import WriteBundle, ReadBundle

# --- Define check functions ---
def check_write_operation(bundle: WriteBundle) -> bool:
    return bundle.we_i.value and not bundle.is_full()

def check_read_operation(bundle: ReadBundle) -> bool:
    return bundle.re_i.value and not bundle.is_empty()

def check_none_operation(agent: FIFOAgent) -> bool:
    return not agent.read.re_i.value and not agent.write.we_i.value

# --- Create coverage group ---
def get_cover_group_basic_operations(agent: FIFOAgent) -> CovGroup:
    group = CovGroup("Basic operations")
    # --- Add coverage points, using named functions ---
    group.add_watch_point(agent.write, {"write_occurs": check_write_operation}, name="Write operation")
    group.add_watch_point(agent.read, {"read_occurs": check_read_operation}, name="Read operation")
    group.add_watch_point(agent, {"no_operation": check_none_operation}, name="No operation")
    return group
Handling Highly Regular Conditions (Factory Functions)
When the check logic of multiple Bins is similar with only a few different parameters, the “factory function” pattern can be used to generate check functions. For example, the read and write pointers only have three comparison relationships: equal to, greater than, less than. The check function can be defined as:
def wptr_compare_rptr(compare_type: int):
    def compare(bundle: InternalBundle) -> bool:
        if compare_type == 0:
            return bundle.wptr.value == bundle.rptr.value
        elif compare_type == 1:
            return bundle.wptr.value > bundle.rptr.value
        else:
            return bundle.wptr.value < bundle.rptr.value
    return compare
When creating check functions, passing in wptr_compare_rptr(0), wptr_compare_rptr(1), wptr_compare_rptr(2) will generate the function object compare for the three conditions. We can then collect coverage for the three pointer conditions via a dictionary expression:
def get_cover_group_pointer_compare(agent: FIFOAgent) -> CovGroup:
    # Define coverage conditions
    def wptr_compare_rptr(compare_type: int):
        def compare(bundle: InternalBundle) -> bool:
            if compare_type == 0:
                return bundle.wptr.value == bundle.rptr.value
            elif compare_type == 1:                return bundle.wptr.value > bundle.rptr.value
            else:
                return bundle.wptr.value < bundle.rptr.value
        return compare

    # Create coverage group
    group = CovGroup("Pointer compare")
    # Add coverage points
    names = ["equal", "greater", "less"]
    """
    The following code is equivalent to:
    group.add_watch_point(agent.internal, {
        "equal": wptr_compare_rptr(0),
        "greater": wptr_compare_rptr(1),
        "less": wptr_compare_rptr(2),
    }, name="Compare wptr with rptr")
    """
    group.add_watch_point(agent.internal, {
        names[i]: wptr_compare_rptr(i) for i in range(3)
    }, name="Compare wptr with rptr")

    return group
Later, if you want to further expand the conditions and not only maintain wptr_compare_rptr but also maintain the name corresponding to each condition in names, consider introducing Python’s enumeration class Enum:
# Enum needs to be imported
from enum import Enum, auto

class Compare(Enum):
    Equal = auto()
    WptrAhead = auto()
    RptrAhead = auto()
We can then use the __members__.items() method of the Compare class to get the name and corresponding value of each condition:
for name, value in Compare.__members__.items():
    print(name, value)
# Output
Equal Compare.Equal
WptrAhead Compare.WptrAhead
RptrAhead Compare.RptrAhead
The complete code becomes:
def get_cover_group_pointer_compare(agent: FIFOAgent) -> CovGroup:
    class Compare(Enum):
        Equal = auto()
        WptrAhead = auto()
        RptrAhead = auto()
    # Define coverage conditions
    def wptr_compare_rptr(compare_type: Compare):
        def compare(bundle: InternalBundle) -> bool:
            if compare_type is Compare.Equal:
                return bundle.wptr.value == bundle.rptr.value
            elif compare_type is Compare.WptrAhead:
                return bundle.wptr.value > bundle.rptr.value
            else:
                return bundle.wptr.value < bundle.rptr.value
        return compare

    # Create coverage group
    group = CovGroup("Pointer compare")
    # Add coverage points
    group.add_watch_point(agent.internal, {
        name: wptr_compare_rptr(compare) for name, compare in Compare.__members__.items()
    }, name="Compare wptr with rptr")

    return group
If you are using Python version >= 3.11, you can also use match... case statements to write wptr_compare_rptr, discarding the tedious if... elif... else... structure:
# Version of python >= 3.11
def wptr_compare_rptr(compare_type: Compare):
    def compare(bundle: InternalBundle) -> bool:
        match compare_type:
            case Compare.Equal:
                return bundle.wptr.value == bundle.rptr.value
            case Compare.WptrAhead:
                return bundle.wptr.value > bundle.rptr.value
            case Compare.RptrAhead:
                return bundle.wptr.value < bundle.rptr.value
            case _:
                return False
    return compare
Coverage Data Collection and Sampling
After defining the CovGroup, its sample() method needs to be called at the appropriate time during the simulation process to collect data and determine which Bins are hit.
Clock Rising Edge Sampling
The most common method is to sample all coverage groups that require periodic checking at a fixed rising edge of each clock cycle. toffee-test provides a convenient mechanism to achieve this:
In the test’s fixture (e.g., the
agentfixture), instantiate allCovGroupobjects that require periodic sampling.Put these
CovGroupobjects into a list.Call
toffee_request.add_cov_groups(your_group_list).
add_cov_groups will automatically complete the following work:
Register each
CovGroupin the list so that itssample()method is automatically called at each clock’s rising edge.At the end of the test, automatically export the coverage statistics results of these
CovGroups to the report.
Taking the following code as an example, an agent object is passed into each test function:
@toffee_test.fixture
async def agent(toffee_request: toffee_test.ToffeeRequest):
    # Creat DUT
    fifo_dut: DUTSyncFIFO = toffee_request.create_dut(DUTSyncFIFO, "clk")
    # Start clock
    start_clock(fifo_dut)
    # Create bundles
    read = ReadBundle().bind(fifo_dut)
    write = WriteBundle().bind(fifo_dut)
    internal = InternalBundle().from_prefix("SyncFIFO_").bind(fifo_dut)
    # Create agent
    fifo_agent = FIFOAgent(fifo_dut.rst_n, read, write, internal)
    # Automatically register and collect coverage information at the clock's rising edge
    toffee_request.add_cov_groups([
        get_cover_group_basic_operations(fifo_agent),
        get_cover_group_fifo_state(fifo_agent),
        get_cover_group_boundary_operations(fifo_agent),
        get_cover_group_pointer_compare(fifo_agent)
    ])
    return fifo_agent
Sampling Based on Specific Timing or Conditions
Some coverage points need to be sampled only after specific timing sequences or complex conditions are met, rather than every clock cycle. For instance, testing a FIFO pointer’s wraparound coverage requires sampling exactly at the moment when the pointer first reaches its maximum value 0xf, and then becomes 0.
For this scenario, automatic sampling with add_cov_groups cannot be used. You need to:
Manually instantiate the
CovGroup, but do not add it to theadd_cov_groupslist.Write an asynchronous task (an
async deffunction) responsible for monitoring the sequence or condition that triggers the sampling.Inside the asynchronous task, when the sequence or condition is met, manually call
your_group.sample().Start the asynchronous task: Use
toffee.create_task()to start this monitoring task and let it run independently in the background.Ensure coverage results are exported: Since this
CovGroupwas not registered viaadd_cov_groups, the testing framework does not export its results by default. You need to manually append thisCovGroupobject to thetoffee_request.cov_groupslist after theyieldof the fixture (i.e. after the test function has finished executing).
The role of yield in a fixture
When a fixture uses yield instead of return to provide objects:
The code before
yieldis executed before the test function starts.The value provided by
yield(e.g.,fifo_agent) is passed to the test function.The test function executes.
After the test function finishes, the program flow returns to the fixture function and resumes execution from right after the
yieldstatement. This offers an opportunity to execute “post-processing” code.
Using a synchronous FIFO as an example, the read pointer rptr and write pointer wptr drop back to 0 on the next increment after reaching their maximum value of 15. Make the coverage point condition pointer’s value equals 0. The related coverage group is defined as:
def get_cover_group_pointer_wraparound(is_wptr: int, agent: FIFOAgent) -> CovGroup:
    # Define coverage conditions
    def wraparound_ptr(bundle: InternalBundle):
        return (bundle.wptr if is_wptr > 0 else bundle.rptr).value == 0

    # Create coverage group
    group = CovGroup("Pointer wraparound")
    # Add coverage points
    name = "Write ptr" if is_wptr > 0 else "Read ptr"
    group.add_watch_point(agent.internal, {"event": wraparound_ptr}, name=f"{name} wraparound")
    return group
In the above code, we control is_wptr to instantiate coverage groups with the same name, but their internal coverage points sample the read and write pointers separately. The results from these two points will finally be combined into the Pointer wraparound coverage group.
Multiple
CovGroupobjects with the same name will have their sampling results merged in the report, but the Bins structure of the equally named coverage points within them must be absolutely identical!
To monitor timing relationships, we can define an asynchronous function wraparound_sequence that endlessly checks the pointer value inside an infinite loop, waits for the value to reach 15, and then waits for the value to become 0 to finally perform a sample. The complete fixture code is:
import toffee_test
from toffee import create_task, Value

@toffee_test.fixture
async def agent(toffee_request: toffee_test.ToffeeRequest):
    fifo_dut: DUTSyncFIFO = toffee_request.create_dut(DUTSyncFIFO, "clk")
    start_clock(fifo_dut)
    read = ReadBundle().bind(fifo_dut)
    write = WriteBundle().bind(fifo_dut)
    internal = InternalBundle().from_prefix("SyncFIFO_").bind(fifo_dut)
    fifo_agent = FIFOAgent(fifo_dut.rst_n, read, write, internal)
    toffee_request.add_cov_groups([
        get_cover_group_basic_operations(fifo_agent),
        get_cover_group_fifo_state(fifo_agent),
        get_cover_group_boundary_operations(fifo_agent),
        get_cover_group_pointer_compare(fifo_agent)
    ])
    # Custom sample group
    cover_pointer_wraparound = [get_cover_group_pointer_wraparound(x, fifo_agent) for x in range(2)]

    # Time sequences
    async def wraparound_sequence(is_wptr: bool):
        ptr = fifo_agent.internal.wptr if is_wptr else fifo_agent.internal.rptr
        while True:
            await Value(ptr, 0xf)
            await Value(ptr, 0)
            cover_pointer_wraparound[is_wptr].sample()

    # Detecting sequence
    create_task(wraparound_sequence(False))
    create_task(wraparound_sequence(True))

    yield fifo_agent
    # Append the elements in cover_pointer_wraparound into cov_groups
    toffee_request.cov_groups.extend(cover_pointer_wraparound)
About create_task:
In the code snippet above, we used create_task(coroutine). This is a vital asynchronous programming tool with the following functions:
Receives a coroutine object (such as the result of calling
wraparound_sequence(True)).Schedules this coroutine directly into the event loop so that it begins executing immediately as an independent background task.
create_taskitself returns immediately aTaskobject (which can be used for later administration, such as canceling the task or usingawaitto block until completion), but it does not wait directly for the coroutine it launches to finish executing.
This is different from await coroutine, where await pauses the current program flow until the awaited coroutine finishes. In comparison, create_task allows us to “fire” off a task so it runs in the background concurrently, while allowing the current code flow to continue handling other operations.
Using create_task, we are fully able to have multiple verification validation logic segments run genuinely simultaneously, cooperating together to accomplish the verification task.
7.5 Summary
Functional coverage is the fundamental metric to measure verification completeness, focusing on whether the design functions are tested as expected. Utilizing CovGroup and add_watch_point in Toffee to outline the coverage model, paired with automatic periodic sampling and manual sampling based on certain sequences, allows for the efficient collection of coverage data, uncovering verification loopholes, and continuously enhancing verification quality.
7.6 Exercises
The exercises for this section have been published, please refer to 【Learning Task 2: Toffee Section】 4. Collect Functional Coverage.
***# 8. Packaging Verification Environment
As the verification environment becomes complex, we need a higher-level container to manage them. Env plays this role in Toffee.
Its main responsibilities include:
Instantiating components: Instantiating all the
Agentcomponents required in the verification environment insideEnv.Managing interface connections: Responsible for ensuring that each
Agentobtains the correctBundleinterface instance. ABundletypically represents the physical or logical interface interacting with the Design Under Test (DUT).Defining Reference Model specifications: The structure of
Env(i.e., its constituentAgents and their methods) implicitly defines the interface specifications that the Reference Model needs to follow.Integrating and synchronizing the Reference Model: For Reference Models written following the specifications,
Envprovides an attach mechanism and is responsible for automatically synchronizing test stimuli and monitoring data to these models at runtime.
8.1 Creating an Env
To define a specific verification environment, you need to create a new Python class and make it inherit from the toffee.env.Env base class provided by Toffee. In your custom Env class, the instantiation of Agents is usually done in its initialization method (__init__).
Here is a simple example of an Env definition:
from toffee.env import *

class DualPortStackEnv(Env):
    """An example of a verification environment containing two stack interface Agents"""
    def __init__(self, port1_bundle: StackPortBundle, port2_bundle: StackPortBundle):
        # Call the parent class's initialization method
        super().__init__()

        # Instantiate the required Agents inside Env and pass the Bundles to them
        # Agent instances are usually kept as attributes of Env for easy subsequent access
        self.port1_agent = StackAgent(port1_bundle)
        self.port2_agent = StackAgent(port2_bundle)
In this example:
We defined the
DualPortStackEnvclass, inheriting fromEnv.The
__init__method receives twoBundleobjects as parameters.Inside
__init__, we instantiated twoStackAgents, namedport1_agentandport2_agentrespectively, and passed the correspondingBundleobjects to them. These twoAgents now become attributes of theDualPortStackEnvinstance.
The connection of Bundles can be done outside or inside the Env. The key is to ensure that each Agent receives the correct Bundle instance.
If the current verification scenario does not require writing a Reference Model for behavioral comparison, then the core structure of the verification environment is now complete. You can directly write test cases and interact with the Design Under Test (DUT) using the Env instance and the interfaces provided by its contained Agents in the test cases, for example:
# Assuming StackPortBundle and DualPortStackEnv have been defined
port1_bundle = StackPortBundle()
port2_bundle = StackPortBundle()
env = DualPortStackEnv(port1_bundle, port2_bundle)

# Accessing Agent methods through Env to drive the DUT or retrieve data
await env.port1_agent.push(1)
await env.port2_agent.push(1)
print(await env.port1_agent.pop())
print(await env.port2_agent.pop())
8.2 Attaching the Reference Model
As mentioned earlier, the structure of Env defines all its contained Agents and their methods (including driving methods and monitoring methods), which constitutes the external interface of the verification environment. For instance, for the DualPortStackEnv above, its interface structure can be represented as:
DualPortStackEnv
  - port1_agent (Type: StackAgent)
    - @driver_method push(data)
    - @driver_method pop() -> value
    - @monitor_method some_monitor() -> value
  - port2_agent (Type: StackAgent)
    - @driver_method push(data)
    - @driver_method pop() -> value
    - @monitor_method some_monitor() -> value
The Reference Model must be written to follow this interface specification defined by Env. A Reference Model that conforms to the specification can be attached to the Env instance using the attach method. The Env is responsible for automatically synchronizing the test case’s invocations of the Agent driving methods and the data obtained by the Agent monitoring methods to all attached Reference Models. An example of the attach operation is as follows:
env = DualPortStackEnv(port1_bundle, port2_bundle)
env.attach(StackRefModel())
An Env instance can have multiple Reference Models attached. All attached Reference Models will be automatically managed and synchronized by Env. The specific methods for writing Reference Models will be introduced in detail in the next section.
9. Writing a Reference Model
The Reference Model plays a crucial role in chip verification, typically used to simulate the expected behavior of the Design Under Test (DUT). During the verification process, by comparing the output of the Reference Model with the actual output of the DUT, we can determine whether the functionality of the DUT is correct.
The Reference Model goes by other names as well, such as Golden model, Predictor, etc.
In the Toffee verification environment, the Reference Model needs to follow the interface specification defined by the Env to which it is attached. In this way, Env can automatically synchronize driving operations and monitoring data to the reference model, enabling automated verification.
9.1 Implementation Modes of the Reference Model
The Toffee framework provides two main modes for implementing Reference Models. Developers can choose the most suitable mode based on the complexity of the Reference Model, state management requirements, and the timing characteristics of interactions with the DUT. Models written in either mode can be integrated and automatically synchronized via the Env’s attach method.
Function Call Mode: The behavior of the Reference Model is defined by a series of hook functions that respond to specific events (method calls). The framework automatically invokes these hook functions when it detects matching events.
Independent Execution Flow Mode: The behavior of the Reference Model is encapsulated within one or more independent, usually asynchronous execution flows (e.g.,
async def main). In this flow, the model actively waits for and retrieves data through ports, and controls its own execution logic.
How to choose an implementation mode?
Function Call Mode:
Advantages: Implementation is relatively simple and straightforward, especially suitable for stateless or simple-state logic models. The framework automatically handles the comparison of the return values of driver methods, reducing boilerplate code.
Disadvantages: It can become difficult to manage for models with complex states, requiring fine control over internal timing, or handling complex dependencies between multiple interfaces. The model responds to events passively.
Applicable Scenarios: Simple protocol checkers, stateless behavioral models, multiple independent small models separating main concerns, etc.
Independent Execution Flow Mode:
Advantages: Full control over the internal state and execution flow of the model, more suitable for simulating complex timing behaviors and state machines. The model can actively manage the data flow and handle complex dependencies between interfaces.
Disadvantages: Requires writing more control flow and comparison logic code. Requires an understanding of asynchronous programming (
async/await).Applicable Scenarios: Complex Bus Functional Models (BFM), models that need to simulate internal pipelines or state machines, models requiring fine control over the transaction processing flow, etc.
Summary of Differences:
Next, we will describe in detail how to write Reference Models in these two modes.
9.2 Using Function Call Mode
The core of this mode is to define Hook Functions and use the decorators provided by Toffee (@driver_hook, @monitor_hook, @agent_hook) to associate them with specific methods of the Agent within the Env.
Suppose the Env interface is as follows:
StackEnv
  - port_agent
    - @driver_method push(data)
    - @driver_method pop() -> value
    - @monitor_method monitor_pop_data() -> item
Driver Hook Function (@driver_hook)
This decorator is used to respond to the invocation of the Agent’s driving methods (methods marked with @driver_method).
Basic Usage
To decorate a method in the model with @driver_hook, you need to specify the target Agent instance name and the driving method name via the agent_name and driver_name parameters.
The argument list of the hook function (excluding self) must exactly match the argument list of the corresponding driver method. The framework will automatically compare the return value of the hook function with the actual return value of the driver method (if the driver method has a return value).
Here is the example code:
from toffee.model import *

class StackRefModel(Model):
    def __init__(self):
        super().__init__()

    # Matches port_agent.push(data)
    @driver_hook(agent_name="port_agent", driver_name="push")
    def handle_push(self, data): # The hook function name is customizable
        pass

    # Matches port_agent.pop()
    @driver_hook(agent_name="port_agent", driver_name="pop")
    def handle_pop(self): # The hook function name is customizable
        pass
Convenient Matching Methods
Toffee provides several ways to simplify matching declarations:
Path specification: Use a dot
.to connectagent_nameanddriver_nameas the first argument.@driver_hook("port_agent.push") def handle_push(self, data): ...Function name matches driver name: If the name of the hook function is the same as the name of the driver method, the
driver_nameparameter can be omitted.@driver_hook(agent_name="port_agent") def push(self, data): # Function name 'push' matches driver_name='push' ...Function name matches both Agent and driver name: Use double underscores
__in the function name to separateagent_nameanddriver_name. In this case,@driver_hook()requires no parameters.@driver_hook() def port_agent__push(self, data): # Function name matches agent_name='port_agent', driver_name='push' ...
Monitor Hook Function (@monitor_hook)
This decorator is used to receive and process data obtained by the Agent’s monitoring methods (methods marked with @monitor_method).
Basic Usage
To decorate a method in the model with @monitor_hook, you need to specify the target using the agent_name and monitor_name parameters.
In addition to self, the monitor hook function must receive an extra argument (typically named item or value), which is used to receive the return value of the monitoring method. Developers need to implement the check logic for the received data (item) within the body of this hook function.
Here is the example code:
class StackRefModel(Model):

    # Matches port_agent.monitor_pop_data()
    @monitor_hook(agent_name="port_agent", monitor_name="monitor_pop_data")
    def monitor_pop_data(self, item): # `item` is the return value of monitor_pop_data
        pass
Convenient Matching Methods
@monitor_hook supports all the same convenient matching methods as @driver_hook (path, function name matching monitor_name, __ convention).
Agent Hook (@agent_hook)
This decorator provides a mechanism for a hook function to handle calls/data for all (or specified multiple) driving and monitoring methods under an Agent.
Basic Usage
To decorate a model method with @agent_hook, you need to specify the target Agent through the agent_name parameter.
The hook function typically needs to receive three parameters: self, name (the name of the called method), and item (which is a parameter dictionary or tuple for driving methods, and a return value for monitoring methods).
Here is the example code:
class StackRefModel(Model):

    @agent_hook("port_agent") # Matches all methods under port_agent
    def port_agent(self, name, item):
        print(f"Model: Agent 'port_agent' method '{name}' called/monitored.")
        pass
Convenient Matching and Advanced Options
Omitting
agent_name: When the hook function name is the same as theAgentname,@agent_hook()requires no parameters.The
agentsparameter: Use a list to match multiple Agents (agents=["agent1", "agent2"]). ```python class StackRefModel(Model): @agent_hook(agents=[“port_agent”, “port_agent2”]) def port_agent(self, driver_name, args): passmethodsparameter: Use a list to match only specified methods (methods=["port_agent.push", "port_agent.pop", ...]), the method name needs to contain the Agent path.class StackRefModel(Model): @agent_hook(methods=["port_agent.push", "port_agent.pop", "port_agent2.monitor_pop_data"]) def port_agent(self, driver_name, args): pass
Hook Execution Order
At the same simulation time step or event trigger point, if multiple Hooks match the same event, their execution order can be configured through parameters.
priorityparameter: Used for all types of Hooks (@driver_hook,@monitor_hook,@agent_hook). A smaller numerical value represents a higher priority (executes earlier). By default,@monitor_hooktypically has a higher priority.@driver_hook("port_agent.push", priority=10) # Lower priority def push(self, data): ... @monitor_hook("port_agent.monitor_pop_data", priority=5) # Higher priority def monitor_pop_data(self, item): ...sche_orderparameter: Only used for@driver_hookand when@agent_hookhandles driver methods. It determines the execution order of the Hook function relative to the actualAgentdriving method (@driver_method) inEnv.sche_order="model_first"(default): The Hook function executes before the driver method.sche_order="dut_first": The Hook function executes after the driver method (usually after its completion).
@driver_hook("port_agent.push", sche_order="dut_first")
def push(self, data):
    # This hook will execute *after* env.port_agent.push() actually drives the DUT
    pass
9.3 Using the Independent Execution Flow Mode
The core of this mode is utilizing Toffee-provided port classes (DriverPort, MonitorPort, AgentPort) to establish connection points with the Env interface within the model, and actively obtaining data and executing model logic through one or more asynchronous methods (usually async def main).
Defining Ports
First, in the init method of the model, you need to instantiate the required port classes and match them with the target methods of the Agent in Env. Ports serve as interaction interfaces between the model and the outside world (i.e. driver calls and monitor data synced from Env).
Basic Usage:
DriverPort(agent_name, driver_name): Used to match the driver method (@driver_method) inEnv. Through this port, the model acquires data to know when the driver method represents is called and its parameters.MonitorPort(agent_name, monitor_name): Used to match the monitor method (@monitor_method) inEnv. Through this port, the model acquires data to know the return value of the monitor method.AgentPort(agent_name): A port matching all driver and monitor methods under a specifiedAgent.
from toffee.model import Model
from toffee.model_port import DriverPort, MonitorPort, AgentPort

class StackRefModel(Model):
    def __init__(self):
        super().__init__()

        # Example: Defining ports using the standard matching way
        self.push_port = DriverPort(agent_name="port_agent", driver_name="push")
        self.pop_port = DriverPort(agent_name="port_agent", driver_name="pop")
        self.monitor_pop_data_port = MonitorPort(agent_name="port_agent", monitor_name="monitor_pop_data")

        # Or, just use one AgentPort to handle all interactions for this agent
        # self.port_agent = AgentPort(agent_name="port_agent")
Convenient Matching Rules
Port instantiation also supports convenient matching rules, which apply to instance variable names and constructor parameters:
- Path specification: Pass the full method path (
agent_name.method_name) as the first argument.
self.push_port = DriverPort("port_agent.push")
- Variable name matches method name: If the instance variable name is the same as the method name (driver or monitor), the
driver_nameormonitor_nameparameter can be omitted.
self.push = DriverPort(agent_name="port_agent") # Variable 'push' matches driver_name
self.monitor_pop_data = MonitorPort(agent_name="port_agent") # Variable matches monitor_name
- Variable name matches both Agent and method name: Using double underscores
__in the variable name to separateagent_nameand method name allows port class constructors to receive no parameters.
self.port_agent__push = DriverPort() # Variable matches both agent_name and driver_name
self.port_agent__monitor_pop_data = MonitorPort() # Variable matches both agent_name and monitor_name
- AgentPort omitting
agent_name: If the instance variable name matches the Agent name.
self.port_agent = AgentPort() # Variable 'port_agent' matches agent_name
Implementing Asynchronous Execution Flow
We need to define a core asynchronous method in the model: async def main(self):. The Toffee framework automatically starts and runs this main method after the model is attached to the Env.
Within the main method, use the await port_instance() syntax to wait for and acquire data from the port. This await operation pauses the current execution flow until the corresponding port receives data. Upon getting data, the model executes its internal logic, which usually includes updating internal state and executing necessary validation comparisons.
class StackRefModel(Model):

    async def main(self):
        print("Model (Independent Flow): Starting main execution loop.")
        while True:
            # 1. Actively wait for driver data of the push operation
            push_args = await self.push_port() # push_args is a parameter dictionary or tuple

            # 2. Actively wait for the pop operation to be called (usually pop's parameters are don't-care)
            # Note: await pop_port() merely synchronizes the time point when the pop call occurs
            await self.pop_port()

            # 3. Actively wait for monitor data corresponding to the pop operation
            monitored_item = await self.monitor_pop_data_port() # This is the actual DUT output
Using AgentPort
If choosing to use AgentPort to uniformly handle all interactions of an Agent, the await operation returns a tuple containing the called method path (string) and associated data (item). You need to dispatch processing logic based on the method path inside the execution flow.
class StackRefModelWithAgentPort(Model):
    def __init__(self):
        super().__init__()
        # Using AgentPort, assuming variable 'port_agent' matches agent_name
        self.port_agent = AgentPort(agent_name="port_agent")
Similarly, when the variable name is the same as the Agent name, the agent_name parameter can be omitted:
self.port_agent = AgentPort()
Furthermore, the agents parameter can be used to match multiple Agents, or the methods parameter can be used to match multiple driver or monitor functions.
After adopting AgentPort, the reference model can use the await keyword to wait for calls to driver or monitor functions in Env; its returning data will be a tuple comprised of the function path and its associated parameters.
9.4 Exercises
The exercises for this section have been published, please refer to 【Learning Task 2: Toffee Section】 5. Write Reference Model and Package Verification Environment.
Further Reading
On Coroutines
Coroutines and Tasks in Python documentation: https://docs.python.org/3/library/asyncio-task.html
Asynchronous Programming in Python - Understanding async, await (further explaining yield): https://www.bilibili.com/video/BV1zJ7mzdEc8
On Pytest
💡Pytest itself provides powerful functions and ecosystems, the following reads are recommended:
Fixture usage in pytest
Mark usage for marker features in pytest
Parametrizing tests using pytest
Utilizing multi-core parallelism to speed up test execution: pytest-xdist
⚠️Warning: If coverage drops after turning on multi-core concurrent execution compared to sequential execution, it indicates that part of the sequential execution’s coverage is artificially driven up by the random values of the initial DUT state, not dependent on input stimulus influence.